I’m happy to say that I’ve made some great progress on my compass needlepoint project! Last time I posted about this was in January, shortly after I started stitching. Well, despite being on the road since May, I have managed to work on it quite a bit.
The pattern is based on a compass rose made of tile pieces on the patio of a charming hotel in France. The hotel is Cuq en Terrasses in the countryside near Toulouse, and it’s one of our favorite places to stay in the world. I find that one of the great benefits of travel is the nearly endless sources of inspiration for future projects.
In the last update, I had just begun the double stitched center tile of the pattern.
The photo below shows the center tile in progress, along with the early stages of the first row of radiating tiles. The double stitch used in the center tile combines a long cross stitch and a small cross stitch, so in this photo you can see I’ve completed all the long XS and have started filling in the small XS.
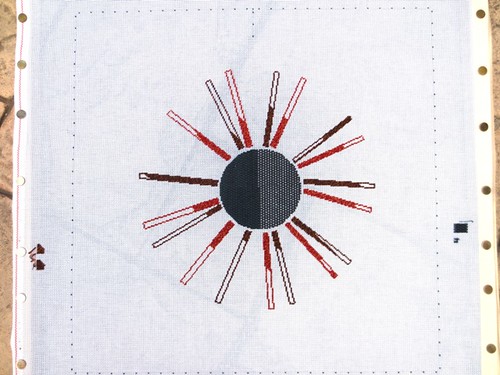
I outlined each of the radiating tiles and then used whatever floss I had remaining in the needle to start filling in. Once I ran out of floss, I moved on to the next tile. I will go back and fill in the remainder of each tile sometime later.
Here, you get to see the project next to it’s original inspiration!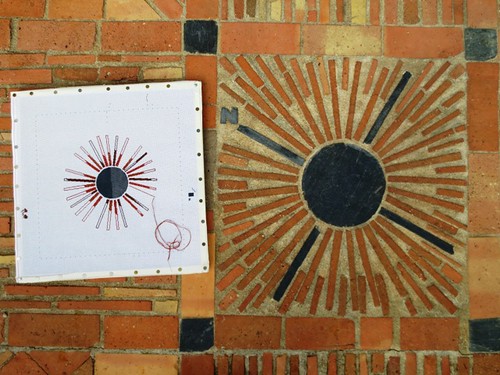
Earlier this summer we were lucky enough to spend a few nights at Cuq en Terrasses. It, as always, was beautiful and charming. I managed to snap a few photos of the project with it’s model in situ.
You can see that I have made the project a little more colorful than the original, but have stayed true to it’s earth tones. At this point I had completed nearly all of the first row of tiles except for the four gray tiles of the primary compass directions.
One of the reasons I stitched the primary direction tiles last is that I was having a tough time trying to figure out how to do the double stitch on them. As I have discovered through this project, double stitch works great on a square area. However, in a slightly irregular shape, it turned into quite a challenge. At some point I will write an entire separate post about how I tackled the situation…
Although once I did tackle those primary direction tiles, WOW!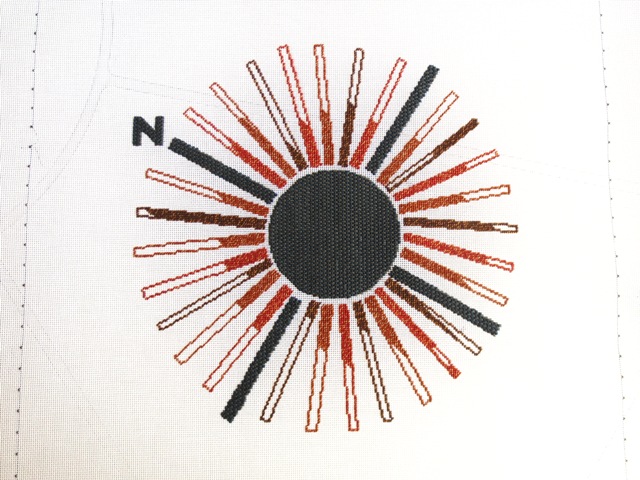
The first ring of radiating tiles are all outlined and partially filled in, except for the NSEW tiles which are completed.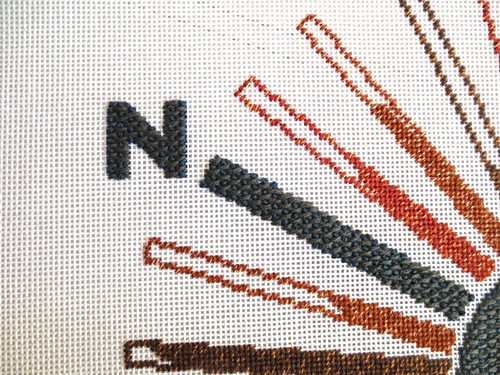
Here you can see the three colorways of brown flosses I chose for this first ring. There’s a chocolate brown, a rusty brown, and a muddy brown. You can also see that I have slightly blended the colors, mixing 5 strands of the darker colors with one strand of lighter colors. I did this to better represent the speckled color and texture of the original tiles and to add a little visual interest. The lighter colors will show up again in the outer rings of tiles as well.
You can also see the two colors I used in the primary directional tiles. The long XS are in a dark grey, while the short XS are in a dark greyish blue color. When I was choosing colors for this project, I thought the blue would make a nice visual compliment to all the earth tones without contrasting too much.
Because of our travel, I have put this project aside for a little while. However, I really look forward to continuing my work on this compass needlepoint!
[Update: More progress as of May 2015!]
[Another update: How to tackle the double stitch!]