This photo organization procedure is here to help those of us with what may seem like a insurmountable challenge. You have a lot of old pre-digital photographs you want to organize. Some are in albums, some are in their envelopes from the developer, some are loose, some are slides… and it’s feeling a little overwhelming. Organizing them is a big job but you can do it!
After we followed these steps, my husband and I now have all our photos organized chronologically, digitized, backed up, and the volume reduced by about 80%.
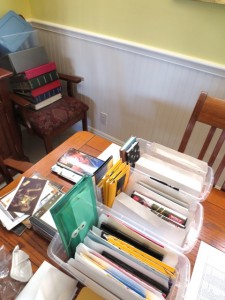 This photo shows my collection of printed photos and memorabilia BEFORE I organized them. Note the albums and the other box of photos on the chair in the corner.
Things to have handy: business size envelopes, manila folders, post-it notes, pen and pencil, note paper, time, and focus. Let’s get started!
Photo Organization Step 1: Take all the photos out of their envelopes, albums, boxes, etc., and put them into chronological order.
You don’t have to dig and find the earliest photos first. Just grab an album, envelope, box, or stack and start taking out the photos. If the album is of a certain occasion, say you went to Kauai in February 2012, put all the photos in an envelope with “February 2012 Kauai” written on it.
If there is no specific occasion, can you determine the month and the year (this was around Mom’s 50th birthday, this was around Chris’ high school graduation)? If you can, put it in another envelope with, for example, “March 1987”, on it. If not, can you determine the year? If you can, put it in another envelope with, for example, “1975”, on it. If not, can you determine the decade? If so, put it in another envelope with, for example, “1940’s”, on it. Keep these envelopes in order because you’re going to find more photos that go in these envelopes as you progress through the pile. [You’re going to love those photos with the date printed on the margins.]
As you go through the photos, if there are any blurry photos, duplicates, shots of the back of someone’s head, or just subjects that are not important (e.g., poorly photographed scenery) THROW THEM OUT! No big deal, who cares! And it’s less to deal with later.
The idea here is that EVERY photo gets put in an envelope or tossed out as part of this first step.
You’re going to find all sizes of photos. Most everything will fit into an open business envelope, but there are going to be some 8 x 10’s or maybe some even larger, so put those in the manila folders and label the folders same as the business envelopes and keep them together.
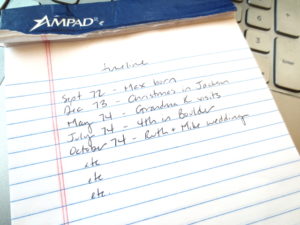 As you create the envelopes, it will help to make a sort of timeline of events for the family. As this timeline develops, it will make it easier to date the photos. Making a chronological list of dates for birthdays, graduations, weddings, travels, funerals, new houses, etc. will help.
Note 1: This excludes photo albums over 60 years old or where there are written notations in the album that identifies the people, places, and things in the photos – but only if these photo albums have any meaning to you. This also excludes scrapbooks with more than photos. I’ll describe more about what to do with notated albums and scrapbooks in Step 3.
Note 2: Negatives. What to do with them? I say toss ‘em, only unless you see a terrific (and I mean it better be National Geographic cover worthy) photo that you would want to get a reprint of. Then get the reprint made and move on.
Photo Organization Step 2: Refine the envelopes
You’ve got an envelope with photos from say, November 1985 for Monica and Bob’s wedding. Hurray! However, how many photos tell a story? Lay out the photos on a table and really sort through them. How many photos do you need of each person at this event? Do you need four photos of the cake? How many photos of the dances do you need? Pick the best and toss the rest.
You’ve got an envelope with photos from 1977. Once again, lay out the photos and really sort through them. Can you now determine if there was an event in 1977 that you can sort into its own envelope or into another existing envelope? How many photos have meaning? Pick the best and toss the rest.
You’ve got an envelope with photos from the 1980’s. Again, lay out the photos and really sort through them. By looking at the other envelopes for the years and events of the 1980’s, can you now sort these photos into more specific envelopes? Which photos are truly significant? Pick the best and toss the rest.
Now is the time to identify people, places, and things in the photos. If the subject matter is obvious, you don’t need to make notes, but if there’s something that other people might not understand about the photo – who this person is, the significance of the item, etc. – make a note on the back of the photo or on a post-it placed on the back.
If you have a slide projector, now is the time to set it up for its final performance. If you don’t have a projector, get a slide viewer or a convenient window and a magnifying glass. Go through the slides with the same eye for content as you have with the printed photos.
At the end of this step, you want to be looking at a major reduction in the number of photos, as well as a good grasp of the content and importance of the remaining photos.
Photo Organization Step 3: Scan the photos and organize the scans
The scanning is a big job and you can either do this yourself or hire someone to do it for you. We did it ourselves, so I can’t add much information about the process of hiring it out. In doing it ourselves, we made sure the envelope groupings stayed intact.
If you have albums or scrapbooks where photos are permanently attached, there is information written on the pages, or a specific layout are important to maintain, scan the whole book, page by page. Modern scrapbooks are on 12” x 12” paper, and those won’t fit on a typical home office scanner. In this case, a trip to a UPS or FedEx office store scanner might be in order. If you have photos in those sticky magnetic and photo damaging album pages, NOW is the time to get those photos out of there!
There are a lot of ways to scan slides. I haven’t had to do it, but here’s an article that describes some different methods.
The digital file organization structure and naming is important. File managers generally sort folders alphabetically, so you don’t want to name your folders with the month name first, e.g., March 2010, April 2010, May 2010. You’ll end up with months in alphabetical order (May 2010, May 2011, May 2012…) and that’s not helpful. Instead, name your folders 201003, 201004, 201005 and they’ll keep their chronological order.
For earlier decades, there may be very few photos. You may want to only have one folder per decade, unless you can identify specific events, like Grandma and Grandpa’s wedding in October 1932. In this case, I’d create a file structure that looked like this:
When I was organizing my 1970’s photos, there were so few that I just created one folder per year. Starting in the late 1980’s I had enough photos and events to necessitate monthly folders. Now, with digital photography, I have sub-monthly folders. For example, in February 2012 there was a family trip to Kauai. For us, that trip had three parts – Kauai with the family, then we went to Oahu to see an aunt who lives in Honolulu, and then we went back to Kauai to see friends on the other end of the island. The file structure looks like this: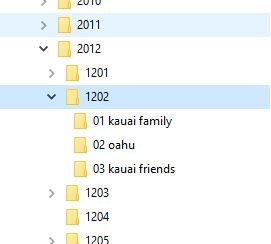
The idea here is to create a file structure to keep the photos organized and in manageable groups. You don’t need to create a folder for every year and month since the dawn of time. However, a good file structure can provide some context to the images.
Photo Organization Step 4: Tag the photos
This is optional, but tagging is a great way to sort photos IF you keep the tags very simple. I’m not sure how it works on a Mac, but on Windows File Manager, there is a data field for every photo called “Tags.” In this field, I put simplified names of people, places, and things.
As my Mom and Dad come from big families, there’s no way I can tag every dang person. My Mom, Dad, Grandmothers, and Grandfather have their own tags, but otherwise I use the first name (a lot of them have the same last name) of the relevant aunt or uncle for themselves and for their descendants.
I tag photos of friends with their last name. I tag photos of pets with their names. I tag locations with “Italy” “Hawaii” or “home.” For photos of my craft projects I use “craft.” I also tag the month and year, and when applicable, the holiday.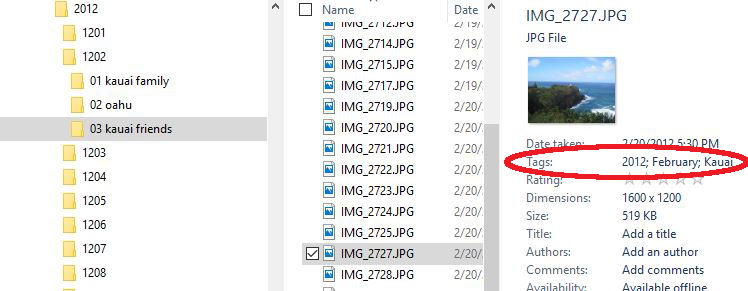
I can then do a search in File Manager for a tag or tags. When I search for “Hawaii” it shows all my photos of Hawaii, regardless of the year I had taken the trip or their file location – because who wants to search through every dang folder?
This can be incredibly useful – when an uncle of mine passed away, his family put out a call for photos to include in a slideshow. It took me about three seconds to see every photo I had of him. From there it was easy to select the photos that I sent to the family.
Photo Organization Step 5: Back up the photos
Dropbox, Flickr, external hard drive, whatever. There’s lots of different things you can use here. Just make sure they’re in more than one place, one of which cannot be destroyed by fire or a natural disaster at your home.
Photo Organization Step 6: Keep the best and toss the rest, again.
Now that you have these photos scanned, do you really need to keep the originals?
I’ll give you a good example. I had a scrapbook of my first trip to Europe in January and February 1994. This was pre-digital photography. I had an inexpensive camera and it was cold and grey most of the time so most of my photos were dark and grainy. In the scrapbook, I mixed things like ticket stubs and museum postcards with the photos.
The photos and ephemera were not precious, but the memory of the trip was. So I scanned the pages of the scrapbook… and then I tossed them out.
The question is – how often will you look at these photos? Are they worth the space they take up? Are you more likely to look at them on screen or in print? Of course, there are going to be photos where you keep the originals – formal wedding photos, baby pictures, graduation shots, happy holidays, sentimental favorites. But do you need to keep ALL originals of the receptions, the birthday parties, and vacation trips? What is more important – holding on to the thing, or holding on to the memory of the thing? Keep the best and toss the rest.
Photo Organization Step 7: Organize the remaining photos
Decide how you want to store the remaining printed photos. Acid free albums and photo boxes, elaborate scrapbooks, frames, or just keeping them in envelopes in a Rubbermaid container all work. You may want to divide the photos amongst the family, or keep them together – it’s not as big a deal if everyone has digital access to every photo. That, and the sheer volume of the photos could be a small fraction of what it was originally.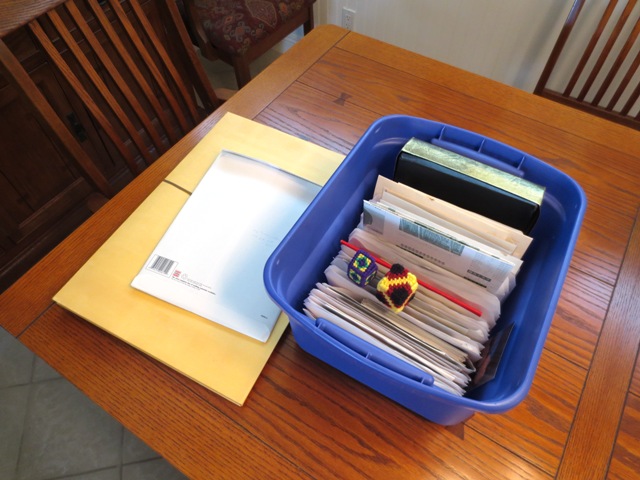
The photo above shows the result of my organization effort – one small storage box plus a larger envelope for a few pieces that wouldn’t fit in the box. No more bulky albums for me!
Photo Organization Step 8: Include other items
My husband and I are in this phase now. Over the years, we’ve collected some stuff – a few Christmas photos from other families, ticket stubs, some choice greeting cards, kid art, just stuff we want to remember. We’re sorting, scanning, and adding these files to our digital photos. Then we’re keeping the very best and tossing the rest again… the result being a huge reduction in weight and volume in unnecessary stuff. It’s lovely!
Good luck with your photo organization! I think you’ll find that it’s very worth the effort.