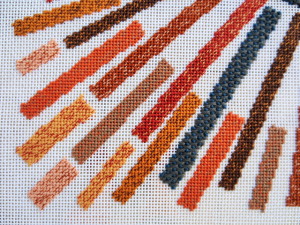
 Double stitch needlepoint is very attractive for filling areas in both needlepoint and cross stitch projects. I’ve used it in two projects thus far, my fun (and free!) Denver Broncos cross stitch tutorial,
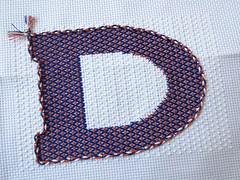
 and again in my Compass Needlepoint project.
It’s a lovely stitch and it can be executed horizontally (as I will present below and as in the photos above) or vertically – it makes no difference as the stitches are worked the same. However, executing it presents some interesting challenges – challenges that this tutorial will address. Let’s start at the beginning…
In diagrams, you’ll see the basic instructions for the double stitch as follows:

Work the long cross stitches (in blue) first as shown in Figure 1b, up through the canvas at 1, down through the canvas at 2, up at 3, down at 4, etc.
Then go back and fill in the small cross stitches (in pink) as shown in Figure 1c, again up at 1, down at 2, up at 3, down at 4, etc.
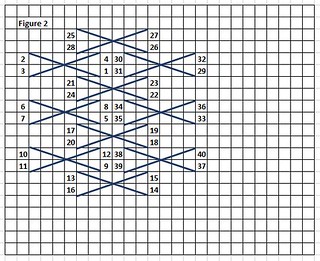
The second column will be worked from bottom to top, and the third column will be worked from top to bottom again. With that in mind, the first three columns of long cross stitches will be stitched in the order shown in Figure 2.

Then the first three columns of small cross stitch will be stitched in the order shown in Figure 3.
In a square or rectangular area, there will be areas on the edges of the rows that will need coverage (shown in yellow).
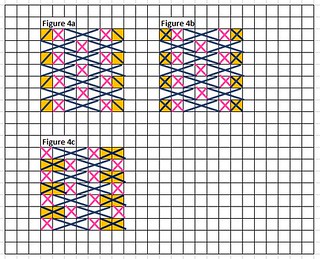
If it’s one stitch, depending on the weight of floss or wool used, these can be covered either with one stitch (in blue) in Figure 4a
or a small cross stitch in Figure 4b (in the diagrams that follow below, you’ll see that I chose to show the single stitch in Figure 4a purely for simplicity’s sake).
If the area on the edge that needs coverage is two stitches, create a two stitch long stitch as shown in Figure 4c.
The double stitch gets more challenging in areas that are not square or rectangular.
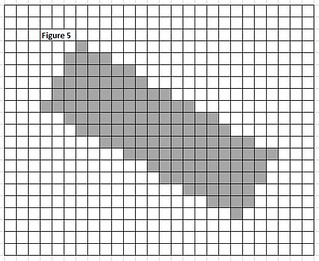
Use the area in Figure 5 as an example. It’s similar to some of the areas in my Compass Tile project. I had a heck of a time wrapping my brain around how to tackle this, and I even put the project on hold for a while until I figured out this approach.
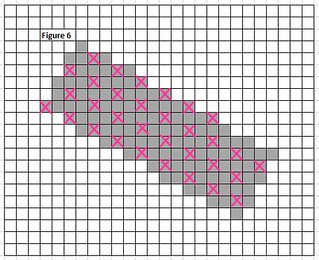
On your pattern, draw the location of the small cross stitches as I did in pink in Figure 6. This will be an invaluable guide. Go ahead and stitch these small cross stitches using the same order of stitching as shown in Figure 3 above.
[What follows is especially important when the small cross stitch and long cross stitch are different colors.]
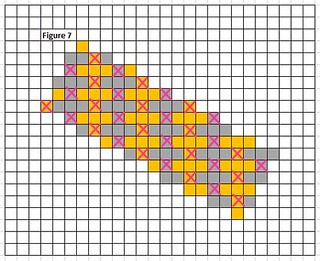
From here, you need to consider the long stitches column by column, AND define what makes a column. With the double stitch, columns look like they do in Figure 7, shown in alternating in gold and gray. Essentially, the long stitches will play hopscotch over the existing small cross stitches while also filling in the extra one stitch and two stitch long stitches on the edges at the same time. This will make more sense as you work through the next few Figures below.

Let’s say we approach this area working from the left to the right. Then if we stitch the first column from top to bottom, the second column will be stitched from bottom to top, third column top to bottom, etc.
Starting from the left, the first column (gold) will only needs one stitch (in blue) as shown in Figure 8.
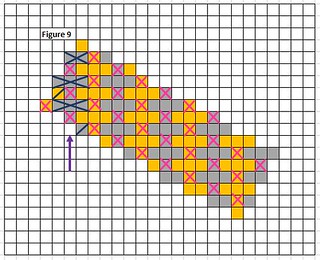
The second column (gray), worked from bottom to top, will need a single stitch, two full long cross stitches and a two stitch long stitch as shown in Figure 9. Stitch the full long cross stitches and two stitch long stitch in the same order as they were shown above in Figure 2.
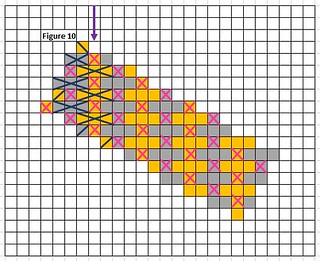
The third (gold) column, worked from top to bottom, will need a single stitch, three full long cross stitches, and another single stitch as shown in Figure 10.
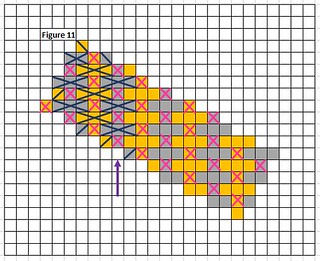
The fourth (grey) column, worked from bottom to top, will need a single stitch, three full long cross stitches, and another single stitch as shown in Figure 11.
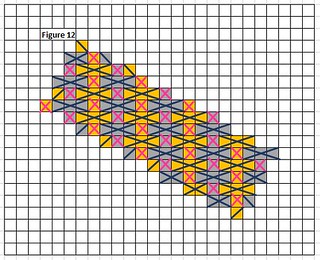
Continue working your long stitches, serpentine-ing up and down as you work from left to right until your area is filled in as shown in Figure 12.
You’ll notice that the directions of the single stitches at the top and bottom and left and right are different. That’s just my preference – you could have them all go the same direction, or make them cross stitches as shown above in Figure 4b.
I hope this helps you use this beautiful double stitch in future needlepoint and cross stitch projects!